MacOS is an intuitive operating system however it always runs out of storage space whenever you need extra space the most. The main reason for the low storage space is its low hardware configuration and large file size of media files. Every photo or video that you capture, takes up high space on the storage. Most of it is duplicate photos and videos that you store on your Mac.
It is not easy to find and remove duplicate photos on Mac. The manual process is time taking and tiring yet you can’t attain accuracy in removing duplicate photos on Mac. Here comes the need for the best duplicate photo finder and remover into play. It can expedite the process of deleting duplicate photos on Mac and regain access to your Mac storage space. Here are the best ways to do it!
Remove Duplicate Photos on Mac Using Photos App
Photos App is an inbuilt utility in MacOS that allows you to explore all the photos. It has a filter to find and list duplicate photos on Mac.
Step 1. Access the Photos App on Mac.
Step 2. Click on the Duplicates tab in the left panel.
Step 3. Select the duplicates that you wish to merge.
Step 4. Select the duplicate photos that are listed in all groups.

Step 5. Click on the Merge (Number) Items to merge all the found duplicates. It will keep the original photo and video (The Best One) and delete the rest of them from the selection.
Please Note: All the deleted items will be sent to the Recently Deleted folder. You can click on the Recently Deleted folder in the left panel and remove them permanently from your Mac storage.
Find Duplicate Photos on Mac with Smart Folder
Smart Folder is one of the best methods to quickly find and delete duplicate photos on Mac. It’s easy to set up, configure and run a smart search on your Mac. It can scan and list out photos based on your search criteria. You can configure multiple search criteria to bring accuracy and delete duplicate photos on Mac. you can search for images in a specific format, with a particular word in a file name, or images by date/last opened.
Step 1. Access the Finder app on your Mac.
Step 2. Go to the Finder bar, click on the File menu, and select New Smart Folder.
Step 3. Click on the Plus button on the right and select search criteria.
Step 4. Select Kind as an Image file and select a file type like JPEG or PNG.

Step 5. Choose how you wish to view the search results from the top. You can select between Details, Grid, or Cover Flow as it shows a wider thumbnail. This makes it easy to view and select duplicate photos.
Step 6. Go to the View menu and select the Arrange By option to arrange them by size or name.
Step 7. Browse all the search results and compare them to identify duplicate photos. Select multiple duplicate images with Ctrl + Click option.
Remove Duplicate Photos Using Duplicate Photos Fixer App
Size: 17.7 MB
Cost: $38.99
Version: 4.9

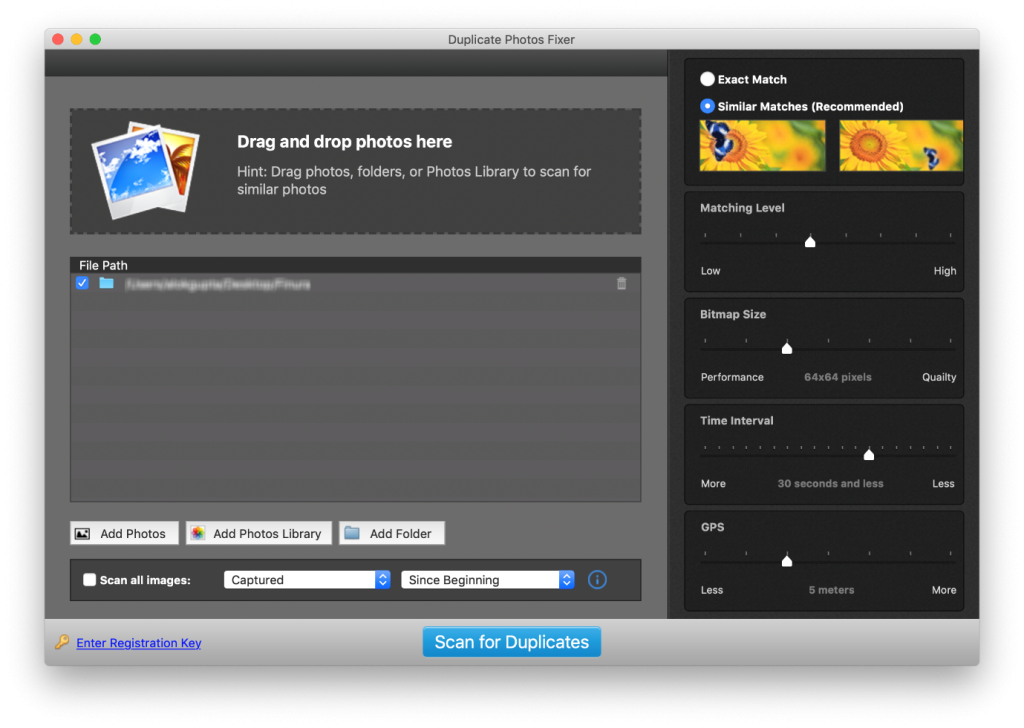
Duplicate Photos Fixer Pro is one of the best duplicate photo finders and removers for all the latest versions of MacOS, Windows, iOS, and Android devices. you can quickly search for duplicate photos and remove exact or similar duplicate images. It is compatible with macOS 10.7+, iPhoto 9.0+, and Photos app. You can run a scan on both internal and external storage space.
It performs a quick and deep scan to list out found duplicates that can be arranged in a group. You can preview found duplicates and manually select duplicate photos one by one or click on the Auto-mark option to select all of them in one go. You just need to hit the Trash Marked to delete all of them with a single click. Selected photos will be sent to the Trash folder from where you can delete them permanently or restore accidentally deleted photos.
Duplicate Photos Fixer Pro also comes with a smart algorithm to perform a scan on the cloud storage. you can quickly scan your Google Drive for duplicate photos and organize your photo albums. It can recover waste storage space and delete all the found duplicates in one go. It has great compatibility with all types of image file formats.
Step 1. Download and install the Duplicate Photos Fixer Pro app from the official website.
Step 2. Configure the scan settings and matching levels to find duplicate photos with accuracy.
Step 3. Select the folder or driver that you wish to scan.
Step 4. Click on the Scan for Duplicates option to initiate the scan.
Step 5. Let it come up with scan results.

Step 6. Preview the scan results and select found duplicates. You can also click on the Auto-Mark button to automatically select the duplicate images in one go.
Step 7. Click on the Trash Marked button to send all of them to the Trash Bin. You can double-check and restore if there is an accidental deletion.
Final Words
Duplicate photos on Mac can take up large space in your storage. The manual methods to remove duplicate photos on Mac may not recover remarkable space. You can use the best duplicate photo fixer app to automate the process and find duplicate photos on Mac with accuracy.


Leave a Reply